Installing or replacing your VIP2202 and VIP2262 set-top box
- Front Panel Lights/Function
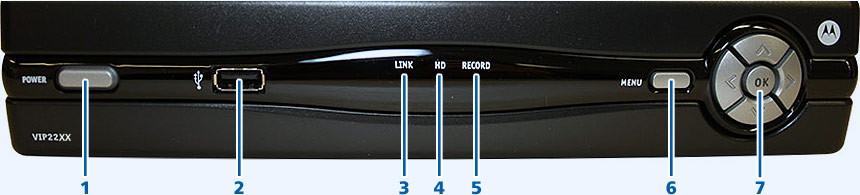
Key Item Function 1 POWER - Press quickly to turn the set-top box on or off.
- Press and hold for 5 seconds to perform a full restart.
- Green: Power is on.
2 USB USB 2.0 port (Not compatible with Bell MTS service). 3 LINK Green: Connected to the Bell MTS TV network. 4 HD Blue: Set-top box is receiving an HD signal. 5 RECORD Red: PVR is recording one or more shows. 6 MENU Displays the on-screen menu. 7 UP/DOWN/LEFT/RIGHT/OK - Arrows allow you to navigate the menu.
- OK selects/accepts channel and menu options.
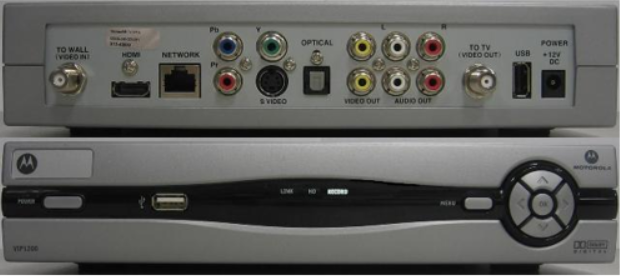
- Rear Panel Function
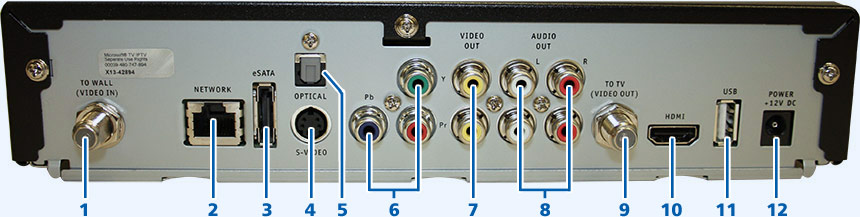
Key Item Function 1 TO WALL (VIDEO IN) Coaxial input from the 2Wire or Pace Residential Gateway to the set-top box. 2 NETWORK Ethernet 10/100 Base-T RJ-45 port. 3 eSATA (Model 2262 only) eSATA connection for external hard drive. (Not compatible with MTS Service). 4 S-VIDEO High-quality video output to a VCR or TV that accepts S-Video. It carries video only; you must also connect to the TV or home theatre receiver for audio. 5 OPTICAL S/PDIF output. High-quality digital audio output (to a digital home theatre receiver). 6 Y PB PR RCA-type component video outputs to an HD-TV or home theatre receiver. It carries video only; you must also connect to the TV or home theatre receiver for audio. 7 VIDEO OUT RCA-type, standard-quality video output (to a TV, VCR, DVD recorder, or other device). It carries video only; you must also connect to the TV or home theatre receiver for audio. 8 AUDIO OUT L & R Stereo audio outputs (Left and right RCA-type). 9 TO TV (VIDEO OUT) Coaxial video output (to a TV or VCR). 10 HDMI High-Definition output. Connects to an HD-TV or home theatre received with an HDMI input. For a DVI input, use an HDMI-to_DVI adapter. 11 USB USB 2.0 port (Not compatible with MTS service). 12 POWER DC power adapter connector. The adapter is different for Models 2262 and 2202. Only use the power cord and adapter supplied with the unit, as they are not interchangeable. - Finding the MAC Address
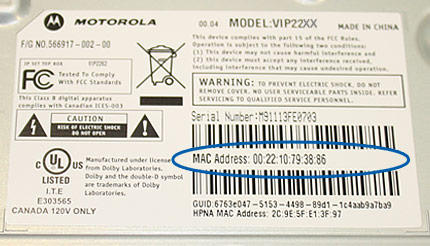
You can find the MAC address on a sticker on the bottom of the unit.
- How to replace your VIP2202 set-top box with a VIP2202 set-top box
- Disconnect all cables from your current set-top box and connect them to the corresponding connections on your new set-top box. If you have a coaxial connection, a wrench or pliers might be required to loosen the coaxial cable.
- If you have a USB device plugged into the front of the PVR set-top box for your RF remote, ensure that you transfer it over to the new PVR set-top box.
- Note: Do not plug in the old power adapter into the new PVR set-top box.
Images may not be exactly as shown. 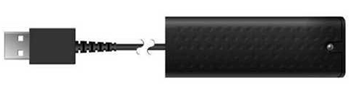
RF USB Receiver
Images may not be exactly as shown.
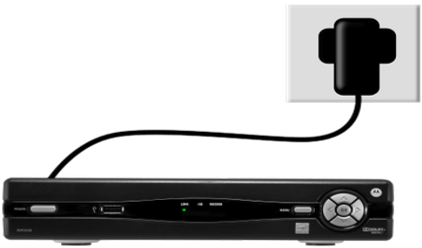
- Connect the set-top box to a power outlet, the lights on the front of the set-top box will flash. The set-top box will take several minutes to load.
Images may not be exactly as shown. - Ensure your TV is set to the correct input (HDMI1, HDMI2, Video1, etc.).
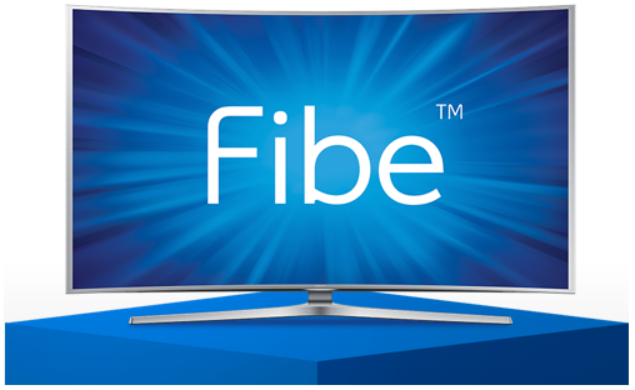
- After a few minutes, the Fibe TV logo will appear on your TV screen when it is ready for use. Press SELECT or OK to watch TV.
Images may not be exactly as shown.
- Disconnect all cables from your current set-top box and connect them to the corresponding connections on your new set-top box. If you have a coaxial connection, a wrench or pliers might be required to loosen the coaxial cable.
- How to replace your VIP1200 set-top box with a VIP 2202 set-top box
- Disconnect all cables from your current set-top box and connect them to the corresponding connections on your new set-top box.
- If you have a USB device plugged into the front of the set-top box for your RF remote, ensure that you transfer it over to the new set-top box.
- Note: Do not plug in the old power adapter into the new set-top box.
VIP 1200 VIP 2202 RF USB Receiver
Images may not be exactly as shown.
- Once you have connected the set-top box to a power outlet, the lights on the front of the set-top box will flash. The set-top box will take several minutes to load.
Images may not be exactly as shown. - Ensure your TV is set to the correct input (HDMI1, HDMI2, Video1, etc.).
- The Fibe TV logo will appear on your TV screen when it is ready for use. Press SELECT or OK to watch TV.
Images may not be exactly as shown.
- Disconnect all cables from your current set-top box and connect them to the corresponding connections on your new set-top box.
- How to replace your VIP2262 PVR set-top box with a VIP2262 PVR set-top box
Note:
All recordings will be lost with the PVR replacement. It is not possible to transfer the recordings from the internal storage (hard drive) on your old PVR to the new PVR.
- Disconnect all cables from your current PVR set-top box and connect them to the corresponding connections on your new PVR set-top box.
- If you have a USB device plugged into the front of the PVR set-top box for your RF remote, ensure that you transfer it over to the new PVR set-top box.
- Note: Do not plug in the old power adapter into the new set-top box.
Images may not be exactly as shown RF USB Receiver
Images may not be exactly as shown.
- Once you have connected the PVR set-top box to a power outlet, the lights on the front of the PVR set-top box will flash. The set-top box will take several minutes to load.
Images may not be exactly as shown. - Ensure your TV is set to the correct input (HDMI1, HDMI2, Video1, etc.).
- The Fibe TV logo will appear on your TV screen when it is ready for use. Press SELECT or OK to watch TV.
Images may not be exactly as shown.
- Disconnect all cables from your current PVR set-top box and connect them to the corresponding connections on your new PVR set-top box.
- How to replace your VIP1216 PVR set-top box with a VIP2262 PVR set-top box
Note:
All recordings will be lost with the PVR replace. It is not possible to transfer the recordings from the internal storage (hard drive) on your old PVR to the new PVR.
- Disconnect all cables from your current PVR set-top box and connect them to the corresponding connections on your PVR new set-top box.
- If you have a USB device plugged into the front of the set-top box for your RF remote, ensure that you transfer it over to the new set-top box.
- Note: Do not plug in the old power adapter into the new set-top box.
VIP 1216 VIP 2262 RF USB Receiver
Images may not be exactly as shown.
- Once you have connected the PVR set-top box to a power outlet, the lights on the front of the PVR set-top box will flash. The set-top box will take several minutes to load.
Images may not be exactly as shown. - Ensure your TV is set to the correct input (HDMI1, HDMI2, Video1, etc.).
- The Fibe TV logo will appear on your TV screen when it is ready for use. Press SELECT or OK to watch TV.
Images may not be exactly as shown.
- Disconnect all cables from your current PVR set-top box and connect them to the corresponding connections on your PVR new set-top box.