Actiontec GT784WNV
- Front Panel Lights / Function
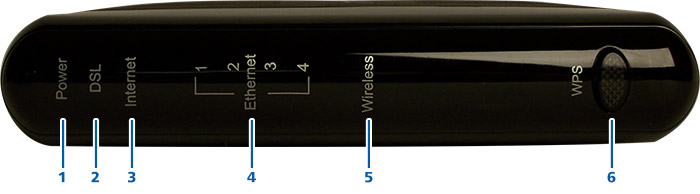
Key Item Function 1 Power The Power light displays the Modem's current status. If the Power light glows steadily green, the Modem is receiving power and fully operational. When the Power light is rapidly flashing, the Modem is initializing. If the Power light glows red when the Power cord is plugged in, the Modem has suffered a critical error and technical support should be contacted. 2 DSL The DSL light illuminates when the Modem is connected to a DSL line and the unit is able to synchronize to the DSL signal from the ISP. When it flashes, the Modem's built-in DSL modem is training for the DSL service. 3 Internet When the Internet light glows steadily, the Modem is connected to the DSL provider. A red light indicates some sort of PPPoE issue (ie: authentication). 4 Ethernet x4 The Ethernet lights illuminate when the Modem is connected to a computer via each yellow Ethernet port. 5 Wireless The Wireless light illuminates when the Modem’s wireless radio is turned on. 6 WPS Depressing the WPS button allows to easily connect a wireless device to your wireless network. - Rear Panel Function

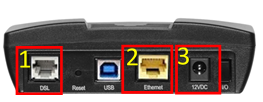
Key Item Function 1 Phone The Phone port is used to connect the modem to a DSL connection. 2 Ethernet x4 Ethernet 10/100 Base-T RJ-45 ports, connects to the network card in your computers. 3 Reset Reset button, used to restore modem to factory. 4 USB Not used. 5 Power DC power adapter connector. 6 Switch Toggle switch to turn power on and off. - Finding the Mac Address
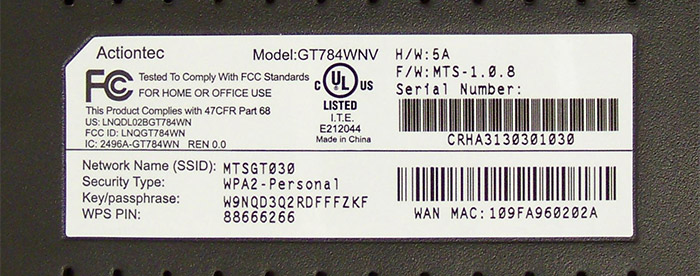
You can find the MAC address on a sticker on the bottom of the unit.
- How to replace an Actiontec GT784WNV with an Actiontec GT784WNV
- Disconnect the cables in sections 1, 2 and 3 on your current Actiontec GT784WNV.

Images may not be exactly as shown. - Connect cables into sections 1 and 2 on your new Actiontec GT784WNV.
- Ethernet cable(s) can be connected to any Ethernet port (section 2).

Images may not be exactly as shown.
- Ethernet cable(s) can be connected to any Ethernet port (section 2).
- Connect the power adapter included in the box to the power port (section 1) on your Actiontec GT784WNV. Ensure the power switch (section 2) is in the On position.

Images may not be exactly as shown. - At this point you will need to configure your new Actiontec GT784WNV. Expand the "How to set up your Actiontec GT784WNV" section and follow the instructions.
- Disconnect the cables in sections 1, 2 and 3 on your current Actiontec GT784WNV.
- How to replace a Speedstream modem with an Actiontec GT784WNV
- Disconnect the cables in sections 1, 2 and 3 on your current SpeedStream modem.
Images may not be exactly as shown. - Connect the phone cable into sections 1 and the Ethernet cable into section 2 on your new Actiontec GT784WNV.
- Ethernet cable(s) can be connected to any Ethernet port (section 2).
Images may not be exactly as shown.
- Ethernet cable(s) can be connected to any Ethernet port (section 2).
- Connect the power adapter included in the box to the power port (section 1) on your Actiontec GT784WNV. Ensure the power switch (section 2) is in the On position.
Images may not be exactly as shown. - At this point you will need to configure your new Actiontec GT784WNV. Expand the "How to set up your Actiontec GT784WNV" section and follow the instructions.
- Disconnect the cables in sections 1, 2 and 3 on your current SpeedStream modem.
- How to set up your Actiontec GT784WNV
Note:
Ensure all cabling has been connected and the DSL light is solid green prior to following this document.
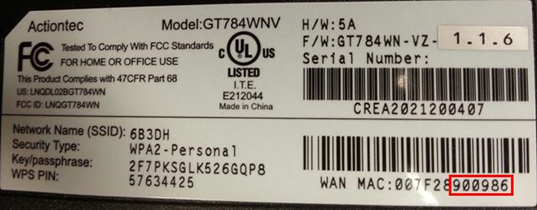
- Write down the last six (6) characters of the WAN MAC.
- WAN MAC is located on the sticker at the bottom of the router.
- This is the default admin password.
- Letters are in uppercase.
Images may not be exactly as shown.
- On your device that is connected to the new Actiontec GT784NV, open a web browser:
- EDGE
- Firefox
- Chrome
- Safari
- Click Into the address bar and type in 192.168.100.254 and press enter.
- Click Next on the Welcome to the MTS HSI Setup Wizard screen.
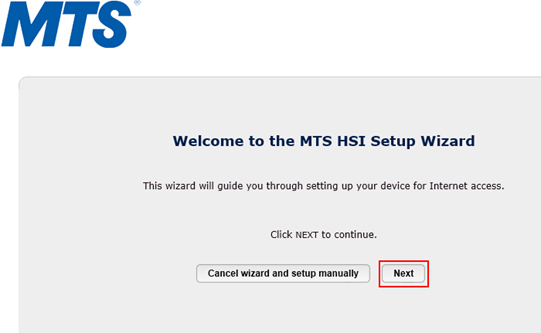
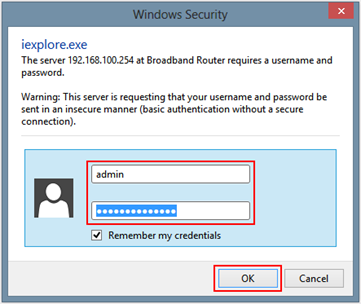
Images may not be exactly as shown. - Type Security authorization (required to continue).
- Username
- admin (Lowercase)
- Password
- Default is last six (6) characters of WAN MAC (Uppercase)
- Username
- Click OK.
Images may not be exactly as shown. -
Router verifies sync with Bell MTS network.
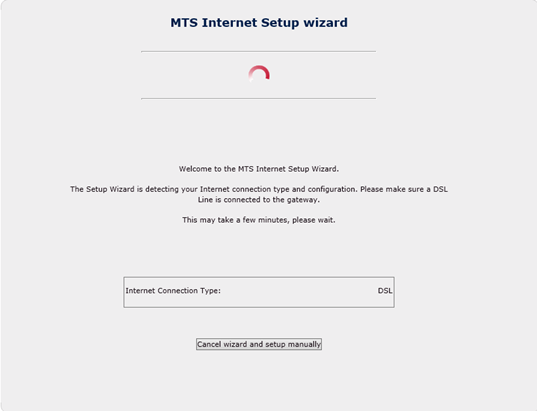
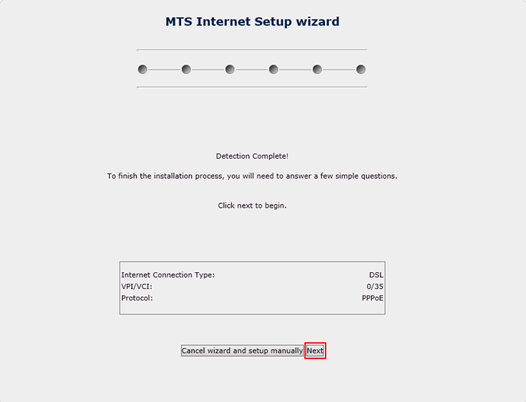
Images may not be exactly as shown. If successful, the Bell MTS Internet Setup Wizard displays Detection Complete. To finish the installation process, you will need to answer a few simple questions. Click Next to begin.
- Click Next, and go to step 9.
Images may not be exactly as shown. -
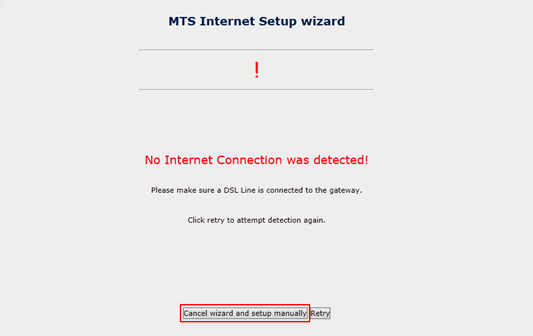
If unsuccessful, the Bell MTS Internet Setup Wizard screen displays No Internet Connection was detected. Please make sure a DSL Line (phone cable) is connected to the Actiontec GT784WNV phone port. Click Retry to attempt detection again.
- If you get the same message No internet Connection was detected, click Cancel wizard and setup manually.
Images may not be exactly as shown. -
Skip to Manual Setup section of this document.
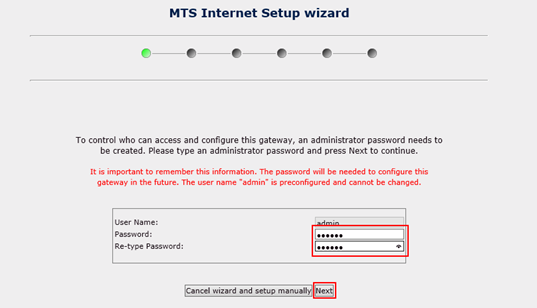
- Type New Admin Password
- Use default password of the last six (6) characters of the WAN Mac address.
- Click Next
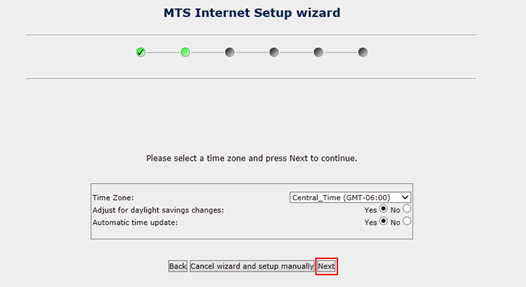
Images may not be exactly as shown. - Click Next
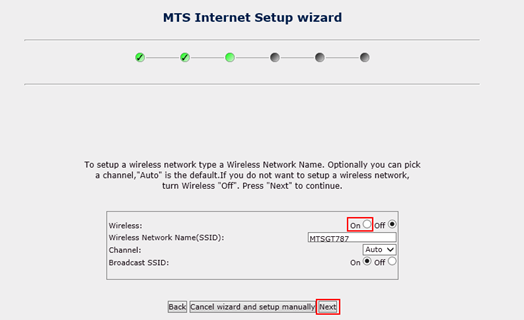
Images may not be exactly as shown. Note:
Wireless is disabled by default.
- Click the On button on the Wireless line to enable Wireless (Wi-Fi).
- Wireless Network Name (SSID) is the name of your new Wireless Network.
- You can use the default wireless network name or enter your own.
- Click Next
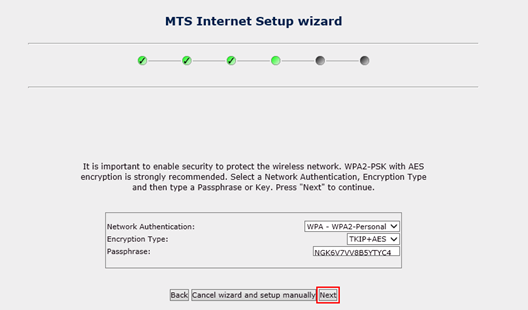
Images may not be exactly as shown. - Network Authentication and Encryption Type should not be changed, they should be left as they are.
- Passphrase field is referring to the Wireless Password. This field can be left as the default or changed to your preferred password (minimum 8 characters in length).
- Click Next
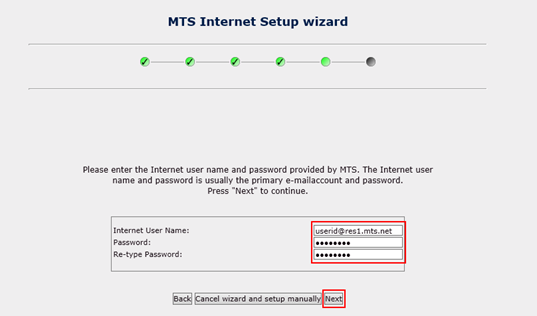
Images may not be exactly as shown. - Type PPPoE Authentication Information.
- Internet User Name (Internet username can be found on your monthly bill or through MyAccount).
- Username@full realm (@res1.mts.net etc?).
- Password (If you don?t know your Internet password, please contact us.
- Internet User Name (Internet username can be found on your monthly bill or through MyAccount).
- Click Next
Images may not be exactly as shown. - If connection fails, you are given a chance to re-enter the User Name and Password. Once you re-enter the information Click Retry.
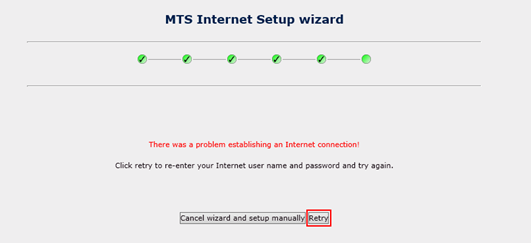
Images may not be exactly as shown. - If the Setup wizard fails for a second time on the Internet Username and Password screen, please contact us.
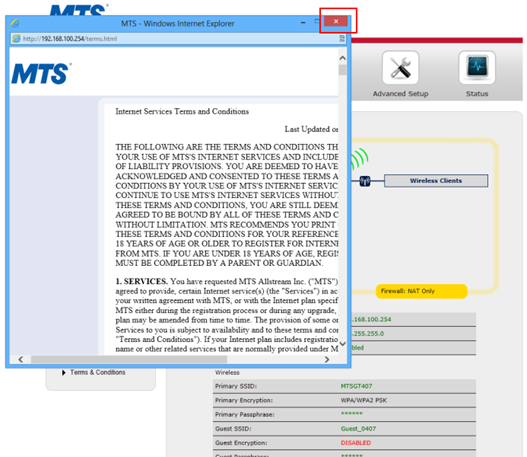
- Review Terms & Conditions pop up window, if you agree click Close. Router summary screen will display.
Images may not be exactly as shown. - Verify Connection Status displays as CONNECTED.
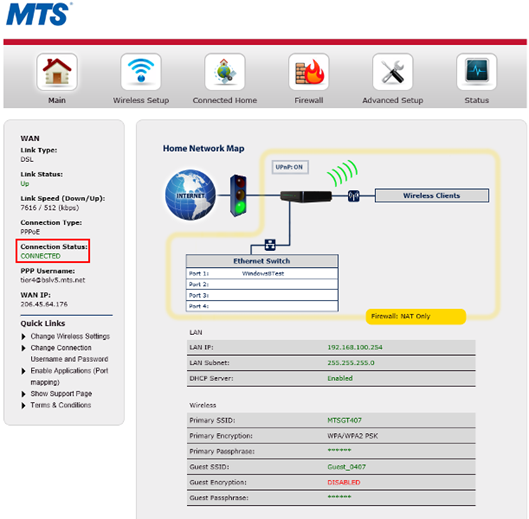
Images may not be exactly as shown. -
Follow the steps below only if the Wizard failed and you clicked on Manual Set up.
Manual Setup
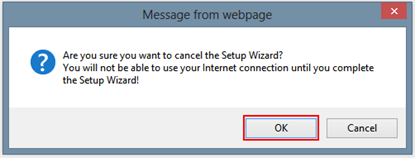
- Click Cancel to exit Setup Wizard on any available window.
- Click OK.
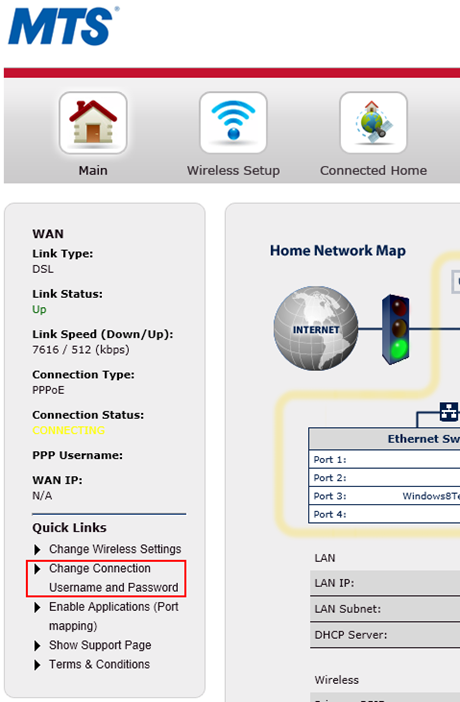
Images may not be exactly as shown. - Review Terms & Conditions pop up window, if you agree click Close.
Images may not be exactly as shown. - Click Change Connection Username and Password.
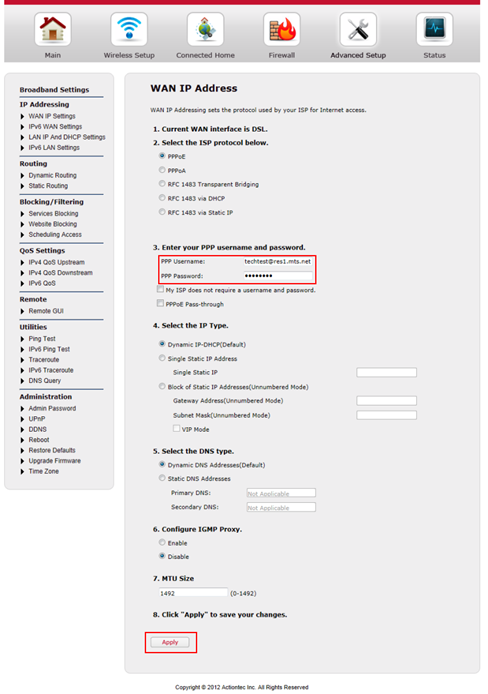
Images may not be exactly as shown. - Type PPPoE Authentication Information.
- Internet User Name (Internet username can be found on your monthly bill or through MyAccount).
- Username@full realm (@res1.mts.net etc?).
- Password (If you don?t know your Internet password, please contact us.
- Internet User Name (Internet username can be found on your monthly bill or through MyAccount).
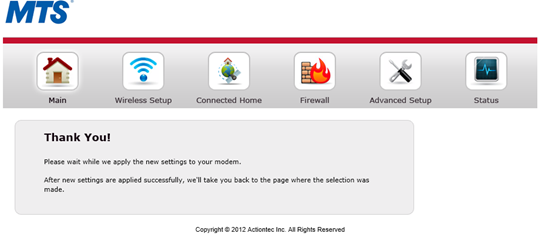
- Click Apply.
Images may not be exactly as shown. - Page will reload as settings are applied.
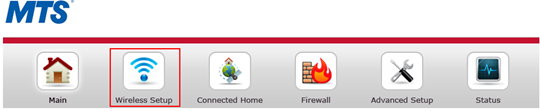
Images may not be exactly as shown. - Click Wireless Setup found at top of screen.
- If you do not need to enable the wireless skip to step thirteen.
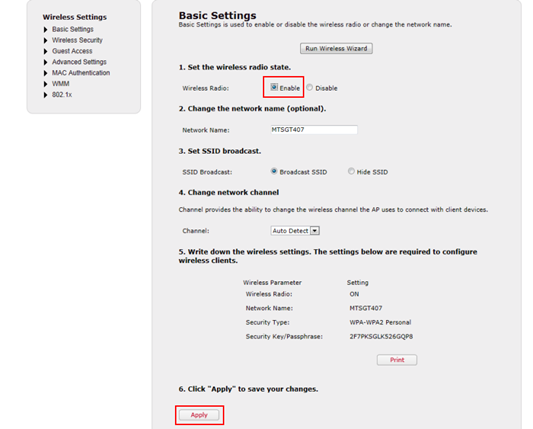
Images may not be exactly as shown. - Click Enable.
- Write down Network Name and Security Key.
- Network Name and Security Key can be customized if desired.
- Click Apply.
Images may not be exactly as shown. - Page will reload as settings are applied.

Images may not be exactly as shown. - Click Main found at top of screen.
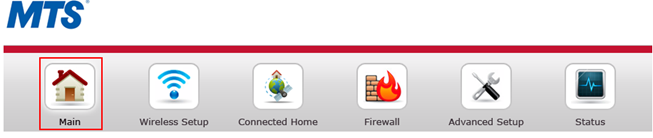
Images may not be exactly as shown. - Router Summary screen will display. Verify Connection Status displays as CONNECTED.
Images may not be exactly as shown.
- Write down the last six (6) characters of the WAN MAC.